Google AdSense

Amazon Ad

Thursday, March 25, 2004

Some more about English flags in 1652 and 1653

I have been looking at more paintings and drawings depicting battles in the First Anglo-Dutch War. I especially notice Wille van de Velde, the Elder, work about the Battle of Scheveningen, as he was actually at the battle. I have also looked at works other van de Velde works, and works by Reinier Nooms and van Diest. There is ample evidence that while the English jack should usually be the "Commonwealth Jack", that vanes were typically white with a red cross, and that it was not uncommon to have large white flag at the main, with a red cross, dividing the flag into quadrants.

There is also ample evidence of red and blue ensigns, with very small white fields, with red crosses. They were usually flown at the stern, but it is not unknown for one to be flown at the main.

More about English flags

I was just looking at Willem van de Velde, the Elder's drawing of the last pass at the Battle of Scheveningen, and I was struck by the fact that there was an English ship depicted with a large flag at the main, that had the large, red St. George's cross on a white flag. I would not have expected that, but it is clearly shown.

I still don't know what are the correct flags to use for the English, in 1652

About the only evidence I have seen about English flags in early to mid-1652 all show the white flag with a red St. George's cross. The only problem is that I doubt that the artist really knew what was right, and just did that as a convenient way to distinguish what were supposed to be English ships.

Tuesday, March 23, 2004

I need to find out the right English flags to use

I realized that I don't really know what flags are appropriate for the English, in May 1652. I have asked for help. If I don't hear, I will go with the Commonwealth Jack, Blue ensigns, vanes, and pennants, and be happy with that, until I get better information.

A relate concern is that I am finding new information which is casting doubt, to some extent, on Dr. Ballhausen's OOB, for the Dutch, at Dover, in May 1652. I need to dig some more.

I am preparing the necessary game pieces for the Battle off Dover (19/29 May 1652)

I followed Iain Stanford's advice, and based the division of the English and Dutch fleets at Dover, based on the sailing order and organization of both (as best we know it). I have calculated the "CV's" (combat values), and just need to do the digital editing to prepare the "stands" (three ships per piece). In my case, they are not the usual sort of thing, but are "tents" with three ship images per outer side. The backside will have names, CV, and the like.

Monday, March 22, 2004

I am making "stands" so that I can try Iain Stanford's rules General-at-Sea

I am making my favorite sort of disposable and easily produced wargame piece, the "tent", for use with Iain Stanford's ruleset, General-at-Sea. It seems that since the groups of ships on each "stand", as you would call it with miniatures, differs with every battle, I will need to make custom pieces for every scenario. Fortunately, since I am reducing my drawings to 1/3200 scale, I can use my drawings that I have "lying around". It won't require the higher quality of 1/1200 scale.

As soon as I have an example, I will make it available, online. I will make a report on my experience, once I have given General-at-Sea "a go".

Saturday, March 20, 2004

Privateers Bounty tactics and maneuvering

I have run more tests with Privateers Bounty, this time using the Battle of Portland scenario. It is much more difficult than the Battle of the Kentish Knock, due to the English being in two groups: George Monck's squadron to the Northeast and the main body to the Southwest. The Dutch are headed East, in between them.

I have tried both the single line and fighting by squadrons. Aggressive use of squadrons, in the early stages can accelerate the damage to the English. If you do not regroup, quickly, as ships take damage and lose mobility, you lose the benefit of maneuvering by squadrons. The one thing NOT to do is allow Dutch ships to be intermixed with English ships, at least not mobile Dutch ships.

In some respects, the single line is easier to handle, because even as ships take damage, they will be adjacent to the line, unless they become isolated, and left behind. Line maneuvers need to be limited to slight course alterations, or order reversals.

The topic of order reversals brings us to the topic of manuevering. In Privateers Bounty, the one thing to avoid is to allow the simulator to decide to turn into the wind. There may be times when this might seem to be the right thing, but it is generally an error. The reason is that you lose mobility for a time, until you can recover on a new course.

I find that I get better results to turn groups (or individual ships) downwind, to establish the turn direction, and then bring the ship towards the desired course. A ciritical thing to watch is to never turn more than 180 degrees, towards the wind, as Privateers Bounty will most likely turn your ship or ships into the wind.

A critical point is to keep as many mobile ships as possible, as long as possible. If you choose to fight a more realistic battle, where you are not fighting to the last ship, you need to choose your course and the moment to disengage so as to maximize your chances. Often, having a rear-guard will buy the main body time to leave the scene of the battle

Friday, March 19, 2004

I ran the Kentish Knock scenario, again

I just ran the Battle of the Kentish Knock scenario, again, to get another "data point" with Privateers Bounty. I ran the scenario with the difficulty set to "Medium". I ran the three Dutch fireships up the East side, and attempted an attack, on the Sovereign and Resolution, but did no damage, before the fireships were sunk.

I formed the Dutch into four groups, beside the fireships, by squadron. I set destination points, initially, to the South-Southeast, by squadron. Again, as last time, the English came up and caught the tail of the Dutch line (which had been the three slowest ships, all belonging to the VOC). The first ship to succumb was the Louise Hendrika. SHe surrendered, and after a long time, was sunk. The Vogelstruis was quickly dismasted. She held out for a long time, but her guns were eventually silenced, which was too bad, because she could have sunk more ships.

The Prins Willem was eventually run down and dismasted. She held on for a long time and sank several ships and disabled the frigate Portsmouth's steering. The main body came up, and the larger ships started raking the Prins Willem, until she caught fire and then surrendered. Meanwhile, the Dutch main body sailed off into the distance.

The eventual result was that 82% of the Dutch were left, while only 61% of the English were left. That translates into six Dutch ships lost, including the three fireshps and the three East Indiamen. The English lost 16 ships, only one of those being a fireship, the Renown. Amazingly enough, the English were beaten pretty badly: the Dutch only lost three warships while the English lost 15. That was a pretty good performance by the Dutch.

A closer look at the "Generals-at-Sea" rules

I have had an opportunity, finally, to give Iain Stanford's General-at-Sea rules a closer examination. In some ways, since he uses the concept of a "stand", there is something of the flavor of Napoleonic miniatures (or whatever your favorite period is). I was particularly impressed by his dealing with the mechanics of sailing ships.

My tendency would be to handle some issues differently. For example, my reading of the use of fireships would separate them more from the commanders. The Dutch, at least, would have them grouped (in General-at-Sea terms) on their own "stand".

I can see that Iain has concentrated on providing mechanisms to allow players to set up and game their own scenarios, independent of history. Since I have more detailed information, generally, about factors like wind direction and time of day, I would incorporate that, rather than trusting to chance.

For playability's sake, General-at-Sea takes some steps towards simplifications that we would find in board games, rather in miniature sailing naval warfare rules. I can't say that it is wrong, as it makes playing some of the larger scenarios feasible, retaining at least a semblance of the right "flavor".

My tendancy is towards less simplification, which is why I have not found miniatures sailing naval warfare gaming feasible. Iain's approach is as good as any I have seen, for making larger battles possible. I am still holding out for less simplification (although that may not be possible).

Iain Stanford's "General-at-Sea" rules

I have provided a link to Geert-Jan Kruijff's page for Anglo-Dutch War naval wargaming resources. This includes a link to download the pdf file for Iain Stanford's wargaming rules: General-at-Sea. His design aim for the game was to scale one miniature piece to three actual ships, and to make the rules simple and fast enough to potentially fight a battle in an afternoon.

Thursday, March 18, 2004

Another test of the Battle of the Kentish Knock scenario

I have had a series of disastrous runs of the Battle of the Kentish Knock, as the Dutch. Tonight, I did another run of the simulator with that scenario. This time, the Dutch tactics were simple. At the beginning of the battle, the fleet is sailing North, with the three fireships at the rear, and the jacht Dordrecht sailing to the port of the rear.

What I did is to stear the Dordrecht to turn to port, to clear the line, and then sailed around to the what would be the disengaged side. The fireships were formed into their own group and sailed North, on the disengaged side. They eventually attacked the group of ships that included the Sovereign (90 guns) and the Resolution (88 guns). One actually set the Resolution ablaze, although they may have eventually extinguished the fire.

I grouped the main fleet into a single group, set the formation as a single line, and then set a destination point to the South-Southeast, so that the line would turn 180 degrees and sail away.

The Southern half of the English fleet actually closed with the rear of the line (used to be the head of the line). The Vogelstruis was dismasted, quite quickly, but kept fighting, sinking quite a few English ships and damaging many more. The other ship disabled was the Henrietta Maria. She was disabled and then had to surrender very quickly, since she was a much less substantial ship. Both ships belonged to the VOC.

By the time the main Dutch fleet had sailed out of sight, the English had lost 9 warships while the Dutch had lost two warships and three fireships. By the standards of the First Anglo-Dutch War, this would have been considered a victory. By Privateers Bounty standards, it is strange, as the usual approach is to annihilate an opponent, no matter what the cost.

Miniatures Sailing Warfare Gaming

I admire the persistence of those who want to continue to game sailing naval warfare with miniatures. I must admit that it is the most interesting and satisfying way to game. The problem is that to use miniatures, you have to make (at least for now) major compromises:

  • Reduce ship numbers
  • Reduce realism and risk over-simplification

  • Even Privateers Bounty does not do all that I would want, but at it least allows gaming with larger numbers and does a credible simulation of gunfire, damage, fireships and fire, in all aspects, as well as the physics of sailing.

    The one hope I see for miniatures is if you can combine computers with miniatures, and retain the satisfaction of having the miniatures, while having the easier, and more accurate bookkeeping and rule enforcement that a computer offers.

    Wednesday, March 17, 2004

    Experiments

    I have run a series of experiments, using the Battle of the Kentish Knock scenario, in Privateers Bounty. The main results are clear:

  • There is power in sailing in a group (close to a line formation), at right angles to an enemy formation, "crossing the T".
  • At least for the Dutch, it is hazardous to "mix it up", in a melee, where there plentiful opportunities for large enemy ships to fire continuous broadsides.
  • Large, heavily armed ships are greatly superior to many smaller ships (300 to 400 tons, burden).
  • Seemingly, the Dutch would be "shot to pieces", if they tried to fight in a single line sailing parallel to a single English line.
  • For the losing side, ships that suffer severe mobility damage can be given up for lost, as they will be run down and sunk.
  • A lot of detailed maneuvering, down to the single ship level, is not useful, when there are still large numbers of ships still mobile and fighting. Formation maneuvering is what matters.
  • Saturday, March 13, 2004

    Tactics for the Dutch

    The one thing that I can absolutely say is that, at least in Privateers Bounty, you cannot fight in a single line, with the Dutch, at least if you allow the English to close, so that they can fire broadsides. The Dutch cannot handle that sort of fire, with impunity.

    In certain scenarios, the Dutch can keep the range long, in which case, if the English try to close, they can be engaged with massed gunfire from the Dutch line.

    The Battle of the Kentish Knock scenario is one place where this is feasible. The Battle of Portland is a different situation. At Portland, if the Dutch try to engage in a single line, the converging Dutch fleet and Monck's squadron will make it impossible to fight at long range. Instead, other tactics are required for the Dutch to win.

    The most reliable strategy is for the Dutch to engage Monck's squadron, first. The Dutch ships need to get in position to deliver concentrated, raking fire against the largest English ships. The Dutch can well fight in small groups that are in line formation, or that are at least on the same course. If needbe, ships need to be maneuvered individually, to avoid broadside gunfire, as much as possible.

    These sort of tactics, massing ships against individual ships, has the best prospect of success. Ideally, an English ship should be attacked at both the bow and stern.

    Once Monck's squadron (in the Portland scenario) is defeated, then the Dutch need to attend to the main English body. Again, the same policy should be followed, to concentrate gunfire against the largest English ships, preferably from a raking position.

    Wednesday, March 10, 2004

    I just fought a VERY different Battle of the Kentish Knock

    I just refought the Battle of the Kentish Knock, where I commanded the Dutch, the difficulty was set at "Medium", and I started the battle with the entire Dutch fleet in single line formation (although they never actually achieved that). I steered the whole Dutch fleet way to the South of the English fleet, and sailed back and forth, each time increasing the distance, as I was able to, given the constraints of the wind.

    The battle proceeded as follows:
    Dutch %English %
    100%95%
    100%90%
    100%85%
    100%80%
    97%78%
    90%78%
    87%76%
    87%73%

    Early on, the Vogelstruis got caught among the English, and was dismasted. She survived, until she surrended at the end. The Dutch fleet sailed off towards the open sea, to the East, and the rear guard was Bastiaan Centen's ship, the Haes (Vlissingen Directors) and the Brederode. The only pursuing ship was the Anthony Bonaventure (for some reason). The Brederode had taken a good bit of sail and rigging damage, so she was slowed. As the fleet and the Haes were pulling away, the Brederode turned on the Anthony Bonaventure, raking her, and causing her to surrender. At that point, the English fleet had turned away, so the Brederode headed for the open sea, following the others.

    This was actually the most realistic battle that I have fought, as it was the most like "real life". In reality, they never fought to annihilate the enemy, while accepted crippling losses.

    Tests of line formation in Privateers Bounty for 17th Century naval

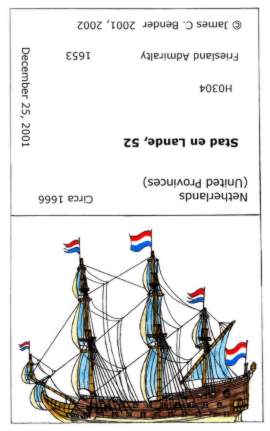
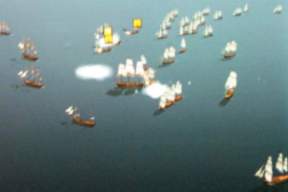
    I just ran three quick tests, using the Battle of the Kentish Knock scenario, where I commanded the Dutch and had the difficulty set to "Hard". The first test, I grouped ships by squadrons, and attacked the North end of the English fleet. It quickly went badly, and I shut it down. I steered to close to thed English fleet and they got among the Dutch formations and heavily damaged them. I quit, when I saw how things were going.

    In the second test, I again grouped the Dutch ships by squadrons, and steered towards the Southern end of the English fleet. Again, the English ships got among the Dutch formations and were winining when I shut the simultion down.

    The third test, I grouped the Dutch ships in a single line, to begin with, and kept steering to the East to attempt to keep the English ships from getting in amongst the Dutch ships. Early on, the Dutch were winning. At one point, it was 95% to 78%, with the Dutch ahead. The Dutch got into trouble when they ran out of searoom, and I had trouble maneuvering the line. I had to regroup ships into smaller formations, with each in a line formation.

    The English started to win, and then win big. At that point, I regrouped the Dutch ships, and had them form single lines. At one point, when both sides had taken heavy losses, the Dutch went into the lead, at least for a short time. It may even have happened twice. Then the balance tipped against the Dutch, and I quit, when it had gotten to 26% to 12%, with the English winning.

    Perhaps my only problem was inexperience in maneuvering formations of ships that are grouped into a single line. At times, there was a clear advantage, and the English quickly took losses, but the English 1st and 2nd rates were able to overwhelm the Dutch, after the smaller ships were decimated. Previously, when I have beaten the English in the Battle of the Kentish Knock, I would eventually maneuver individual ships, and concentrate them against the English 1st and 2nd rates, and overwhelm them. By not doing that, things quickly "got out of hand".

    Gaming with 17th Century ships

    After having done sufficient 18th Century naval wargaming to have a better sense of it, I can say, definitively, that 17th Century gaming is quite difference. The cause is the small size of 17th Century ships, compared to 18th Century ships.

    In a battle simulation such as the Battle of the Saintes, ships shed masts and rigging, fairly easily, but they have considerable resistence to being sunk. That is not true in 17th Century battles, as most ships are sunk by gunfire, while quite a few blow up, either from fire or gunfire.

    What this means is that quite different tactics are required. While I don't recommend (at least in Privateers Bounty) sailing in line, close to the enemy, who is also in line, and trading gunfire at close range, you can do it for a while. In a 17th Century simulation, you would be rapidly decimated, and would quickly lose, if you have the smaller, more lightly-armed ships. They are the first to be lost under sustained gunfire.

    I do believe there are considerable benefits to fighting in line (at least by squadron), but I would try to be in a position to rake, and to minimize the chance of receiving heavy gunfire. If you do sail in line, keep a distance between your ships and the enemy ships, so they fewer can turn and fire broadsides.

    Tuesday, March 09, 2004

    I just won the Battle of the Saintes, as the British, 72% to 0%!

    I just fought one of my best battles, using Privateers Bounty, ever. As the British, I just won the Battle of the Saintes, in an overwhelming way. Not only was the "score" 72% to 0%, but there were a large number of surrendered ships, from both the French and British, littering the scene of the Battle.

    Again, I grouped ships (using the CTRL-digit system), assigned a formation, and then set a destination point. An interesting feature of this is that everytime you assign the formation, all the ships in the group become selected, and then you assign the destination point. All ships are then affected, without having to reselect them.

    The rear of the British line, at the start of the battle, ended up being largely dismasted, but they mostly did not suffer that badly. They formed a line, almost like they were fortifications. One, the Centaur, spent most of the game raking the French flagship Ville de Paris. In this simulation, the Ville de Paris was the last French ship to surrender. I was sure she would be sunk, first. Towards the end, there were at least four British ships raking her.

    At the end, when the last French ship had surrendered, there were still 4-6 British ships that were quite mobile. They were able to get in position to run down the remaining French survivors, and force them to surrender.

    A feature of this battle was that I was constantly resetting destination points, either for groups (preferably), or where there were isolated ships that were still mobile, I would be maneuvering them to be able to rake the French ships. That was a key reason for my success: readiness to regroup ships and constantly getting them into postion to rake.

    Monday, March 08, 2004

    More Privateers Bounty

    I just ran the Battle of the Saintes scenario that comes with Privateers Bounty. I think three points that I noticed, this time, are worth noting:

  • only break the enemy line if a gap opens,
  • group ships and assign the line formation to them,
  • use your groups that are in line to rake enemy ships, and minimize their ability to use broadsides against your ships.

    You need the flexibility to maneuver by squadrons, as a long, single line is unwieldy, and subjects your fleet to too much broadside fire from enemy ships (especially if they are larger and more heavily armed than your ships).

  • Using that approach, I did rather better (though not acceptably good) in the Battle of the Saints, winning 30% to 0%. This advice applies to 17th as well as 18th and 19th Century scenarios.

    Wargame pieces

    This is my low-end answer for the need for wargame pieces for miniatures games.

    Brederode wargame piece
    Brederode

    Stad en Lande wargame piece
    Stad en Lande

    Difference between 17th and 18th Century ships in Privateers Bounty

    There really are some distinct differences between 17th and 18th Century battles, run in the Privateers Bounty simulator. The difference is largely the difference in ship characteristices. 17th Century ships are considerably smaller, and are more lightly armed, at least prior to 1660. Only the very largest were armed on the 18th Century scale.

    That difference manifests itself in a number of ways:

  • 17th Century ships burn easily

  • 17th Century ships can more easily be sunk by gunfire

  • 18th Century battle scenes are littered with dismasted ships that, otherwise, still have considerable fighting strength

  • 17th Century battles can employ line-breaking tactics, as the opposing gunfire is less potent

  • 18th and early 19th Century battles can only be fought (with impunity) using line-breaking tactics, if a gap appears in the opposing line. Otherwise, there is likely to be considerable damage taken in the process of line-breaking.

  • These are the obvious differences that I have learned from running a half-dozen 18th Century scenario simulations, over the weekend. Needless to say, I have run a much greater number of 17th Century scenarios.

    Sunday, March 07, 2004

    I finally won the Battle of the Saintes

    Again, this is off-topic, except that it is another scenario in Privateers Bounty. I had two false starts, where I lost confidence in my ability to win the Battle of the Saintes, as the British, and shut them down. I finally won, if you can call 16% to 0% a victory. Technically, it might be a victory, but I have grown accustomed to the 70% to 0% (if not better) style victory, where you really won something.

    I really like the 17th Century battles, as they are equivalent to something else I prefer, early WWII tank battles, where the tanks and anti-tank guns are pretty small. Many, if not most gamers like the late-war tanks and guns, where the tanks are monsters and so are the guns. If you get a hit, the tank is destroyed (almost certainly). In the early war scenario, the shot might hit, but "bounce". 17th Century ships, especially the First Anglo-Dutch War, are more like that. The shot doesn't "bounce", but the damage might be small (although the ship may only have a small capacity to "take" damage).

    The Battle of the Virginia Capes (rather off-topic)

    I recently joined the "WoodenWalls" Yahoo group, after finding that another group was dominated by gamers (men, in fact) who were only interested naval wargames from about 1890 to the modern era. In fact, I found I was not welcome, and pointed to "WoodenWalls".

    "WoodenWalls" is mainly populated by miniature sailing naval wargamers. Quite naturally, they are mainly interested in late 18th and early 19th Century battles. One gentleman said that he could "only dream of" fighting the Battle of the Virginia Capes. I guessed that might be a pre-defined scenario for Privateers Bounty. That proved to be the case, although it had a strange name "Battle for the Chesapeake".

    I expected that I could just run it, and win. I thought I would start with the British fleet (of 19 ships of the line), and was being handily beaten by the "computer". I thought, "OK", and tried the French. I was was losing rather badly, and gave it up.

    I tried, again, later, the French, and won 79% to 0%. I did not like how many immobile ships the French had, scattered across the scene of the battle, but I felt like I understood how to win in this era of large, heavily-armed ships.

    What I did differently was to establish groups (CTRL-digit), and assign them the line formation, closely spaced. I also maneuvered by smaller groups (not necessarily the official groups). I essentially circled around the outside of the British fleet, hoping to be in position to rake as many as possible. I actually had several groups around the periphery. Fairly quickly, I reached a "tipping point", and the battle turned into a "mop-up" operation.

    Saturday, March 06, 2004

    Privateers Bounty: my Battle of Portland scenario

    I just ran the Battle of Portland scenario, on the simulator, and fought the battle with using destination points, and made every attempt to fight in something resembling a line. In this battle, I maneuvered burning ships, and those ships around them to keep fires from spreading to other ships. This allowed the Dutch to win 60% to 0%.

    I had the difficulty level set to "Hard", and attacked the English main body (two squadrons), at the beginning of the battle. George Monck's squadron came up, later, and those ships were some of the last survivors, along with two ships from the other end, which tried to fleet (including the Speaker (Third Rate).

    Towards the end, I maneuvered individual ships and small groups, to get them into position to rake English ships. Again, as often happens, there was tipping point, at which time, the English cause was lost beyond rescue.

    Privateers Bounty: my Battle of the Kentish Knock scenario

    This picture shows the Dutch fleet closing with the English fleet, in the Battle of the Kentish Knock. The wind direction is from the North, which is towards the top of the picture.


    The small vessel leading the lower squadron is the Zeeland three-masted yacht, Dordrecht (17 guns). The squadron is Cornelis Evertsen de Oude's "Reserve Squadron". North of that is of Gideon de Wildt's "Rear Squadron" and North of that is part of Witte de With's squadron. Michiel De Ruyter's squadron is up, out of sight, leading the fleet.

    The Battle of the Sound scenario

    I reran the Battle of the Sound scenario, and tried a different approach. The battle went much better, although it was still hard-fought. Eventually the Dutch reached a tipping point, and there what was left, was to do "mop up" of the remaining Swedish ships.

    What I did was to reverse the Dutch fleet's course, and head towards the Eastern side of the Sound. This put the Dutch in a better position to cap the Swedish "T". The battle really progressed well, until Dutch ships started to catch fire. I immediately turned the crews to firefighting, but they accumulated more damage than they would otherwise have.

    The Dutch fleet sailed back and forth in their position on the West side, while the six Dutch transports ran past the Western end of the Swedish fleet, headed for Copenhagen with troops and supplies for the besieged city.

    One thing that I did that I have not done much with, previously, was to turn the Dutch crews, on ships that had received extensive sail damage, to repair sails. That made the more heavily damaged ships more mobile. Often, they had lost a mast, so they were not up to their normal mobility, but late in the scenario, they provided an anvil force to help trap the last Swedish ship. The Dutch won, finally, 46% to 0%. I had made no attempt to do anything about burning ships (such as altering their course, and that of surrounding ships). That caused the Dutch losses to be as high as this.

    More Privateers Bounty simulation tips

    Camera Tips

    One point sorely lacking in the booklet for Privateers Bounty is information about how to control the "camera". Mostly, I have discovered the tricks accidentally. I don't understand why this isn't documented, by my friend in Russia says it is not in the Russian version of the documentation, either.

    Change camera directionRoll your roller on your mouse forward, and hold. Then move the mouse, and you will see that you can rotate the view.
    Zoom inHold the roller forward and slide the mouse up the screen
    Zoom outHold the roller forward and slide the mouse down the screen
    Move the camera to angle along the seaRoll the roller forward and release
    Look down on the sceneRoll and roller towards you, and release

    This is a scene from my Battle of the Kentish Knock scenario

    I had hoped to have one or more pictures from the running Battle of the Sound scenario, but none of them were clear. Instead, I do have a digital picture from January 27, 2004, from my Battle of the Kentish Knock scenario. A (nasty) feature of Privateers Bounty is that they don't have any 17th Century 3D ship models, except for the one 3-masted merchant vessel. The simulation is still interesting enough to be useful. I have tried to contact the developer in Russia (Akella), but have never received a reply.

    Scene from my battle of the Kentish Knock scenario

    Friday, March 05, 2004

    The importance of using the wind

    I just ran the Battle of Plymouth scenario, with me as the Dutch (as usual) and had the difficulty set to "High". This was a very difficult battle, at least in part to the wind direction, relative to the English fleet. A large factor, is that the English outnumbered the Dutch, and the English had several large ships. The English also had the wind, and that made maneuvering difficult for the Dutch, as they Dutch wanted to close, but wanted to maintain a course that would keep them both in line and at right angles to the English. I ended up having a large number of ships stuck with their bows directly into the wind.

    I finally started maneuvering groups of ships, rather than the whole fleet. I finally started to make progress. Eventually, there was a tipping point, where the Dutch started to cause English ships to sink or surrender in large numbers, and then there only remained task of destroying the remaining English ships.

    I finally had to individually maneuver Dutch ships to concentrate them on the remaining few English ships. ALL of my ship maneuvering was with "Destination Points". That is vastly superior to just setting a heading. I actually don't understand why that is so much better. I only have a good deal of experience that shows that it is (based on results). A friend had recommended it to me, and I immediately adopted the practice, after testing it.

    I just ran another test, fighting "in line"

    I just ran my Battle of the Kentish Knock scenario. This time, I had the difficualty set to "Hard". The Dutch still won 65% to 0% (65% of the Dutch fleet was still in action, while all the English were sunk or surrendered).

    A feature of having the difficulty set to "Hard" is that Dutch ships catch fire frequently. They also run into each other catch others on fire. If you select the ship, and have the crew fight the fire, then that is adequate. If it is one of your fireships on fire, you might either steer the fireship into an English ship or else off at a tangent, away from your ships.

    Quite quickly, there were 90% of the Dutch ships and only 23% of the English ships in action. Once the percentages got to 87% to 19%, the fighting got tougher. The Sovereign (90 guns) was still in action, and I had not been agressive enough to "cross its T". All too quickly, the percentages were at 70% to 11%.

    After I became more diligent about sailing back and forth, and changing the angle to maximum the Dutch being in line, and putting the line at right angles to the Sovereign and Vanguard, the balance quickly tipped. Suddenly, it was 65% to 7%, and then 65% to 4% and then 2%. The last three English ships were the Exchange (M), the Mary Flyboat, and the Little President. All are very small vessels, so you can see that when the larger ships had surrendered and then were sunk, the battle was quicly won for the Dutch.

    A revelation--Frank Fox would have expected this

    I just fought the Battle of the Kentish Knock scenario, as usual, with me as the Dutch. I only set the difficulty to "Medium". I did something quite different. Instead of trying to break the English "line", I fought in "line".

    I almost always maneuvered the fleet as a whole. The only time I maneuvered individual ships was when they got into an awkward position, at the ends of the fleet.

    I did ALL maneuvering by setting "destination points". I have given up on any other way of maneuvering ships. This is a much better system, if for no other reason, you can visualize how the course will take the ship, by the light blue line that is show.

    The final result was 85% of the Dutch fleet was still in action, while the English fleet was totally destroyed. Remember that the English had the Sovereign (90 guns) and Resolution (88 guns), so you can see the magnitude of this accomplishment.

    How the battle progressed:

    Dutch %English %Remaining English
    87%19%Little President, Sovereign, Vanguard, Lion, James, Diamond, Nonsuch, and Ruby
    87%14%Little President, Sovereign, James, Diamond, Nonsuch, and Ruby
    85%11%Little President, Sovereign, James, Nonsuch, and Ruby
    85%9%Sovereign, James, Nonsuch, and Ruby
    85%7%Sovereign, Nonsuch, and Ruby
    85%2%Nonsuch
    85%0%--

    Frank Fox is a big advocate for fighting in a single line. I have been a big advocate of breaking the line and concentrating against ships. I did not fight this battle in a single line, but I kept sailing back and forth, aligning the general axis of the Dutch fleet at right angles to the English, as much as possible. The AI used in Privateers Bounty really facilitates this, as the enemy ships generally head towards you, so you can easily rake them. In the fine detail, the AI works pretty well, maneuvering the "enemy" ships so as to rake your ships, so it is not so easy as it might be to deal with the enemy fleet.

    My intent is to run more experiments, with the Dutch fighting so that they are generally sailing, as a fleet, at right angles the general English course. I will report on the results, when I have more than a single datapoint. I will also try running with the difficulty set to "Hard". My Battle of the Kentish Knock scenario seems a good testbed, as the English ships are generally much larger. I have found if I misjudge, that I can easily lose the battle.

    Thursday, March 04, 2004

    The Battle of the Sound scenario

    I need to update the Battle of the Sound scenario, for Privateers Bounty, to include crew and gun data from the package I received, recently, from Jan Glete. I have the Swedish captains' names, the breakdown between sailors and soldiers on ships, and I have updated gun lists from August 1658. I still want to compare these with what Dr. Ballhausen published, which were taken from a book by Johan Levin Carlbom.

    Amazon Context Links